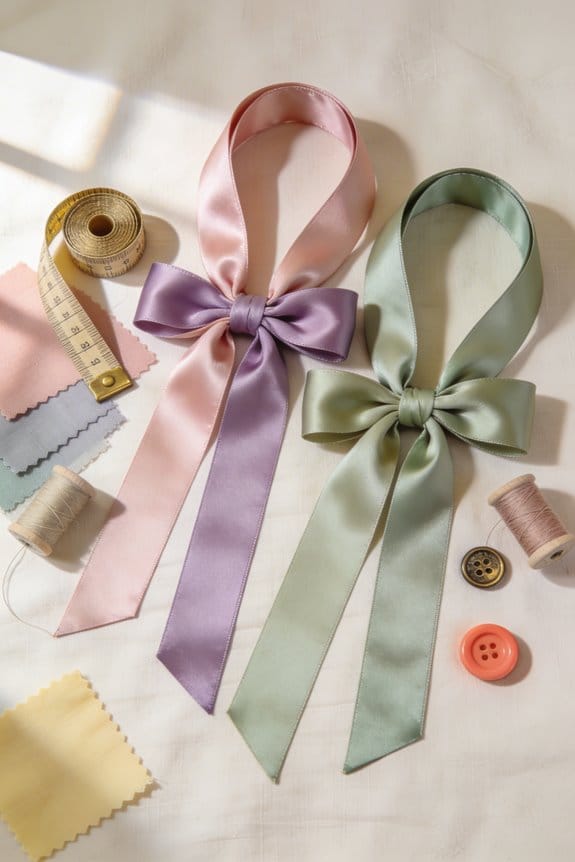
To tie the perfect sash bow on a girl’s dress, we start by laying the sash flat to prevent twists. Next, we cross one side over the other and tie a knot for balance. Then, we form loops with each side, adjusting their size for fullness and symmetry. If the loops are uneven or if the bow feels loose, we can make careful adjustments. This guarantees a polished look, and we’ll explore more tips for achieving perfection shortly.
Key Takeaways
- Use high-quality materials like satin or taffeta for a polished appearance and comfort when tying the sash bow.
- Lay the sash flat and cross one side over the other, ensuring even tension while tying the initial knot.
- Create balanced loops by adjusting their sizes, ensuring the bow’s fullness complements the dress.
- Check tail lengths for symmetry and adjust the knot accordingly to achieve a visually appealing look.
- Experiment with embellishments and textures to enhance the overall style, making the sash bow unique and eye-catching.
Essential Tools and Preparation for Tying a Sash Bow
When it comes to tying a sash bow on a dress, it can be a bit of a challenge if you don’t have the right tools handy. First off, you want to grab high-quality sash materials like satin or taffeta. Trust me, this makes a huge difference in how vibrant the bow turns out.
Next, make sure you’ve got some accessories close by, like clips for holding things in place and scissors for any adjustments. Before you dive in, it’s a good idea to lay out the sash flat to avoid any twists that might complicate your tying game. If your sash is on the wider side, folding it in half can really help manage it better.
A light steam before you start? Honestly, it’s a small step that creates those crisp edges you want, especially if you’re working with thicker materials.
Using materials that offer a soft texture and resist pilling can help maintain the bow’s appearance over time, ensuring it looks great for many occasions, much like the benefits found in fleece material.
With all your tools and prep in place, you can focus on what really matters—creating a stunning sash bow. Remember, it’s all about the little details that make your bow stand out. Have you thought about how much a nice bow can elevate your outfit? It’s worth taking the time to get it right.
Step-by-Step Guide to Tying Sash Bows

Tying a sash bow on a dress can feel a bit daunting, right? But it doesn’t have to be! Let’s break it down step by step for a smoother experience.
First, take a moment to straighten both sides of the sash. You’ll want it to lie flat without any twists or turns. This simple step makes all the difference. Once you’ve got that sorted, cross side A over side B, making sure to keep an even tension throughout.
Now, it’s time to tie your first knot. Here’s the trick: aim for balance so that your bow looks nice and even. After that, create your first loop using side B. Adjust its size according to how big you want your bow to be.
When you’ve got that loop right, flip it around and form the second loop with side A. Make sure to secure it tightly. Honestly, if you feel like the loops aren’t symmetrical yet, don’t worry! Just adjust them and the tails until everything looks nice and neat.
In the end, you want that bow to sit flat against the dress, giving you a polished look. So, how do you typically tie a bow? If you have any other tips or tricks, share them! Incorporating detachable bows or sashes can enhance the versatility of flower girl dresses and make styling easier.
Troubleshooting Common Sash Bow Mistakes

Ever tried tying a sash bow and ended up feeling frustrated instead? It’s a common struggle, but you’ll be glad to know that those mistakes are easily fixable. One issue that pops up often is uneven loops. If you notice one loop is bigger than the other, just gently pull on the shorter side until they balance out nicely.
What about when your bow is hanging a little too loose? Don’t stress! Just tighten that knot a bit more, but make sure it still feels comfy. Honestly, there’s nothing worse than an uncomfortable bow. And if you find a twist in your sash, that might mean you rushed the process. Go ahead and unravel it, then re-tie it carefully for a smoother finish.
For extra flair, consider adding a formal bowknot to complement the sash and enhance the dress’s elegance.
Tips for Adjusting Your Sash Bow
Adjusting a sash bow can make a world of difference in both style and comfort for your little one. Ever faced the dilemma of a bow that just doesn’t look right? Let’s dive into some simple tweaks you can do that’ll have her looking fabulous and feeling great.
First off, take a look at the loop size. You want those loops to complement the dress, not overwhelm it. If they seem out of balance, gently tug on the tails to even them out. It’s a quick fix that goes a long way.
Next, let’s focus on the tails. Ideally, they should be hanging at the same length. If one tail is longer, all you need to do is adjust the knot a bit or pull that tail to even things out. This little adjustment might sound minor, but it can really elevate the whole look.
As you’re making these adjustments, remember to ensure that the bow sits nice and flat against the dress. You don’t want it poking out awkwardly! A well-placed bow not only looks polished but also keeps your child comfortable in her lovely outfit.
For added practicality and style, consider dresses with pockets that complement the sash bow without hindering movement.
Variations on Sash Bow Styles to Consider
Have you ever stood in front of the mirror, adjusting your sash bow, only to feel like something’s missing? After you get that perfect look, it can be fun to think about how to take it to the next level. There are so many ways to customize your sash bow for that unique flair.
For starters, consider the classic bow. It’s timeless and always in style. But if you’re feeling adventurous, why not try layered bows? They add a beautiful depth that can really stand out. Switch up your ribbon choice too; satin offers a sleek finish, while organza has that airy feel, and grosgrain brings a bit of texture. Each ribbon type changes the entire vibe.
Size matters, too. A larger bow can really make a statement, while a petite one can appear sweet and dainty. Think about the seasons as well! Soft pastels are perfect for spring while rich, warm colors fit beautifully into fall. And where you place the bow can make a difference—should it be off to one side, or centered?
You might even want to get creative with embellishments. Flowers or gems can add an extra pop that ties together your whole look. Isn’t it interesting how these small tweaks can instantly make your dress the talk of the party?
When selecting the perfect dress, ensure it includes adjustable features for comfort and a flawless fit, which helps your sash bow sit beautifully without discomfort or awkward bunching from the fabric. This is especially important in toddler sizes where growth and fit may vary.
How to Care for Your Bow and Sash After Tying
Caring for your bow and sash after tying isn’t just a chore; it’s crucial for keeping them looking great. Ever pulled a sash too hard and heard that dreaded ripping sound? Yeah, not fun. So, treat that sash gently. Avoid tugging or twisting, as it can ruin the fabric.
When your bow and sash aren’t in use, proper storage is key. Try this: hang your dress on a padded hanger or lay it flat in a drawer to keep it wrinkle-free. If you’ve got a delicate fabric, wrapping the bow loosely in a soft cloth also does wonders. How great would it be to take it out and find it spotless and creaseless for your next event?
Don’t forget to regularly check for any loose threads or fraying edges. Honestly, catching small issues early on is the best way to avoid bigger headaches later. By following these simple tips, you’ll keep those bows looking fresh and beautiful, ready for whatever occasion comes next. Choosing bows made from lightweight fabrics like chiffon helps maintain their shape and comfort throughout formal events.
Customization Ideas for Your Sash Bow?
How can you make your sash bow stand out from the crowd? The color of the sash is a great place to start. Trying out different shades can really change how the whole dress looks.
Embellishments are another fun option to consider. Think about adding beads or floral appliques—they can give a personal touch that makes the sash your own. Want something a bit more playful? Mixing patterns can create an eye-catching contrast. Imagine combining polka dots with stripes—it’s unique and adds flair!
Seasonality can inspire your choices too. For spring, soft pastels will brighten your look, while deep, rich hues work wonderfully for autumn. And what about the size of your bow? A larger bow can be a stunning statement at more formal events, whereas a small one might be the perfect finishing touch for everyday wear.
Ribbons come in all kinds of textures, so choose wisely. Satin brings an elegant vibe, but grosgrain adds a playful touch. The best part is that it should all connect with your outfit seamlessly.
Considering the fabric quality and comfort of the sash material can enhance both the look and wearability of the dress.
Frequently Asked Questions
What Types of Sashes Are Best for Tying Bows?
For tying bows, we love satin and organza sashes—they’re versatile! These materials hold their shape well, making our bow techniques easier to execute. Plus, they add a lovely touch to any outfit!
How Can I Make My Sash Bow More Durable?
We can make our sash bow more durable by using sturdy sash materials and employing precise bow techniques. Choosing thicker fabrics and ensuring tight knots will help maintain its shape while enduring wear and tear.
Can I Use Ribbon Instead of a Sash?
Absolutely, we can use ribbon alternatives! Different ribbon textures, like satin or organza, work beautifully. They add a unique flair to our project while ensuring the bow looks stylish and holds up well. Let’s explore options together!
How to Choose the Right Sash Color for My Dress?
When choosing the right sash color for our dress, we should consider complementary sash color combinations and seasonal color palettes. Let’s reflect on the overall look we want to achieve and select accordingly!
What Length Sash Is Ideal for Bow Tying?
An ideal sash length should be around 80 to 100 inches; this allows for magnificent bow visibility. We can create stunning bows together, making any dress truly unforgettable with the right proportions and careful attention!


 8")